

What if the leak isn’t where the bubbles appear? Before deciding how to patch a drop stitch water slide seam, identify whether air is escaping from a seam, the main panel, a valve or another component. A seam failure isn’t the same as a small puncture, and treating one like the other can leave the slide unsafe to use.
It’s understandable to want a quick fix, especially when outdoor fun is on hold. But the wrong patch or adhesive may not suit the slide’s material or intended use. This guide explains how to locate the damage, judge whether a patch may be appropriate and recognise when to stop. The slide maker’s instructions should guide your choice of materials and repair method.
You’ll find practical steps for assessing and preparing the damaged area, along with the limits of DIY repairs and what to do if the seam continues to separate or you can’t identify the leak. Keep the slide out of use until its condition and any repair have been checked as directed. If replacement is the better option, explore Crocpad’s inflatable water slides.
Key Takeaways
- Identify whether the leak is from a seam, a puncture or a valve before choosing a repair approach.
- Drop-stitch construction can affect repair choices, so use the maker’s instructions to select materials and a method.
- Patch a drop-stitch water slide seam only when the damage and the approved method make a patch suitable.
- Prepare the area carefully and follow the slide and repair product instructions rather than guessing.
- Know which warning signs mean the slide should stay out of use after a repair attempt.
Drop-stitch water slide seam damage: identify the failure before patching
Identify the leaking component before choosing a patch or repair method. A split along a join, a small hole in a panel and air escaping around a valve can seem similar at first, but they need different responses. A patch designed for a local surface hole may not address a separating seam. Adhesive or leak-detection liquid could also damage materials if the slide maker hasn’t approved it.
A drop-stitch seam is the joined edge of a drop-stitch panel; the term alone doesn’t tell you how a particular slide’s seam is constructed. Check the product’s care or repair instructions before treating a suspected seam as a simple bonded edge. Construction and approved repair methods vary, so don’t assume advice for another inflatable applies to your slide.
How to locate a suspected seam leak
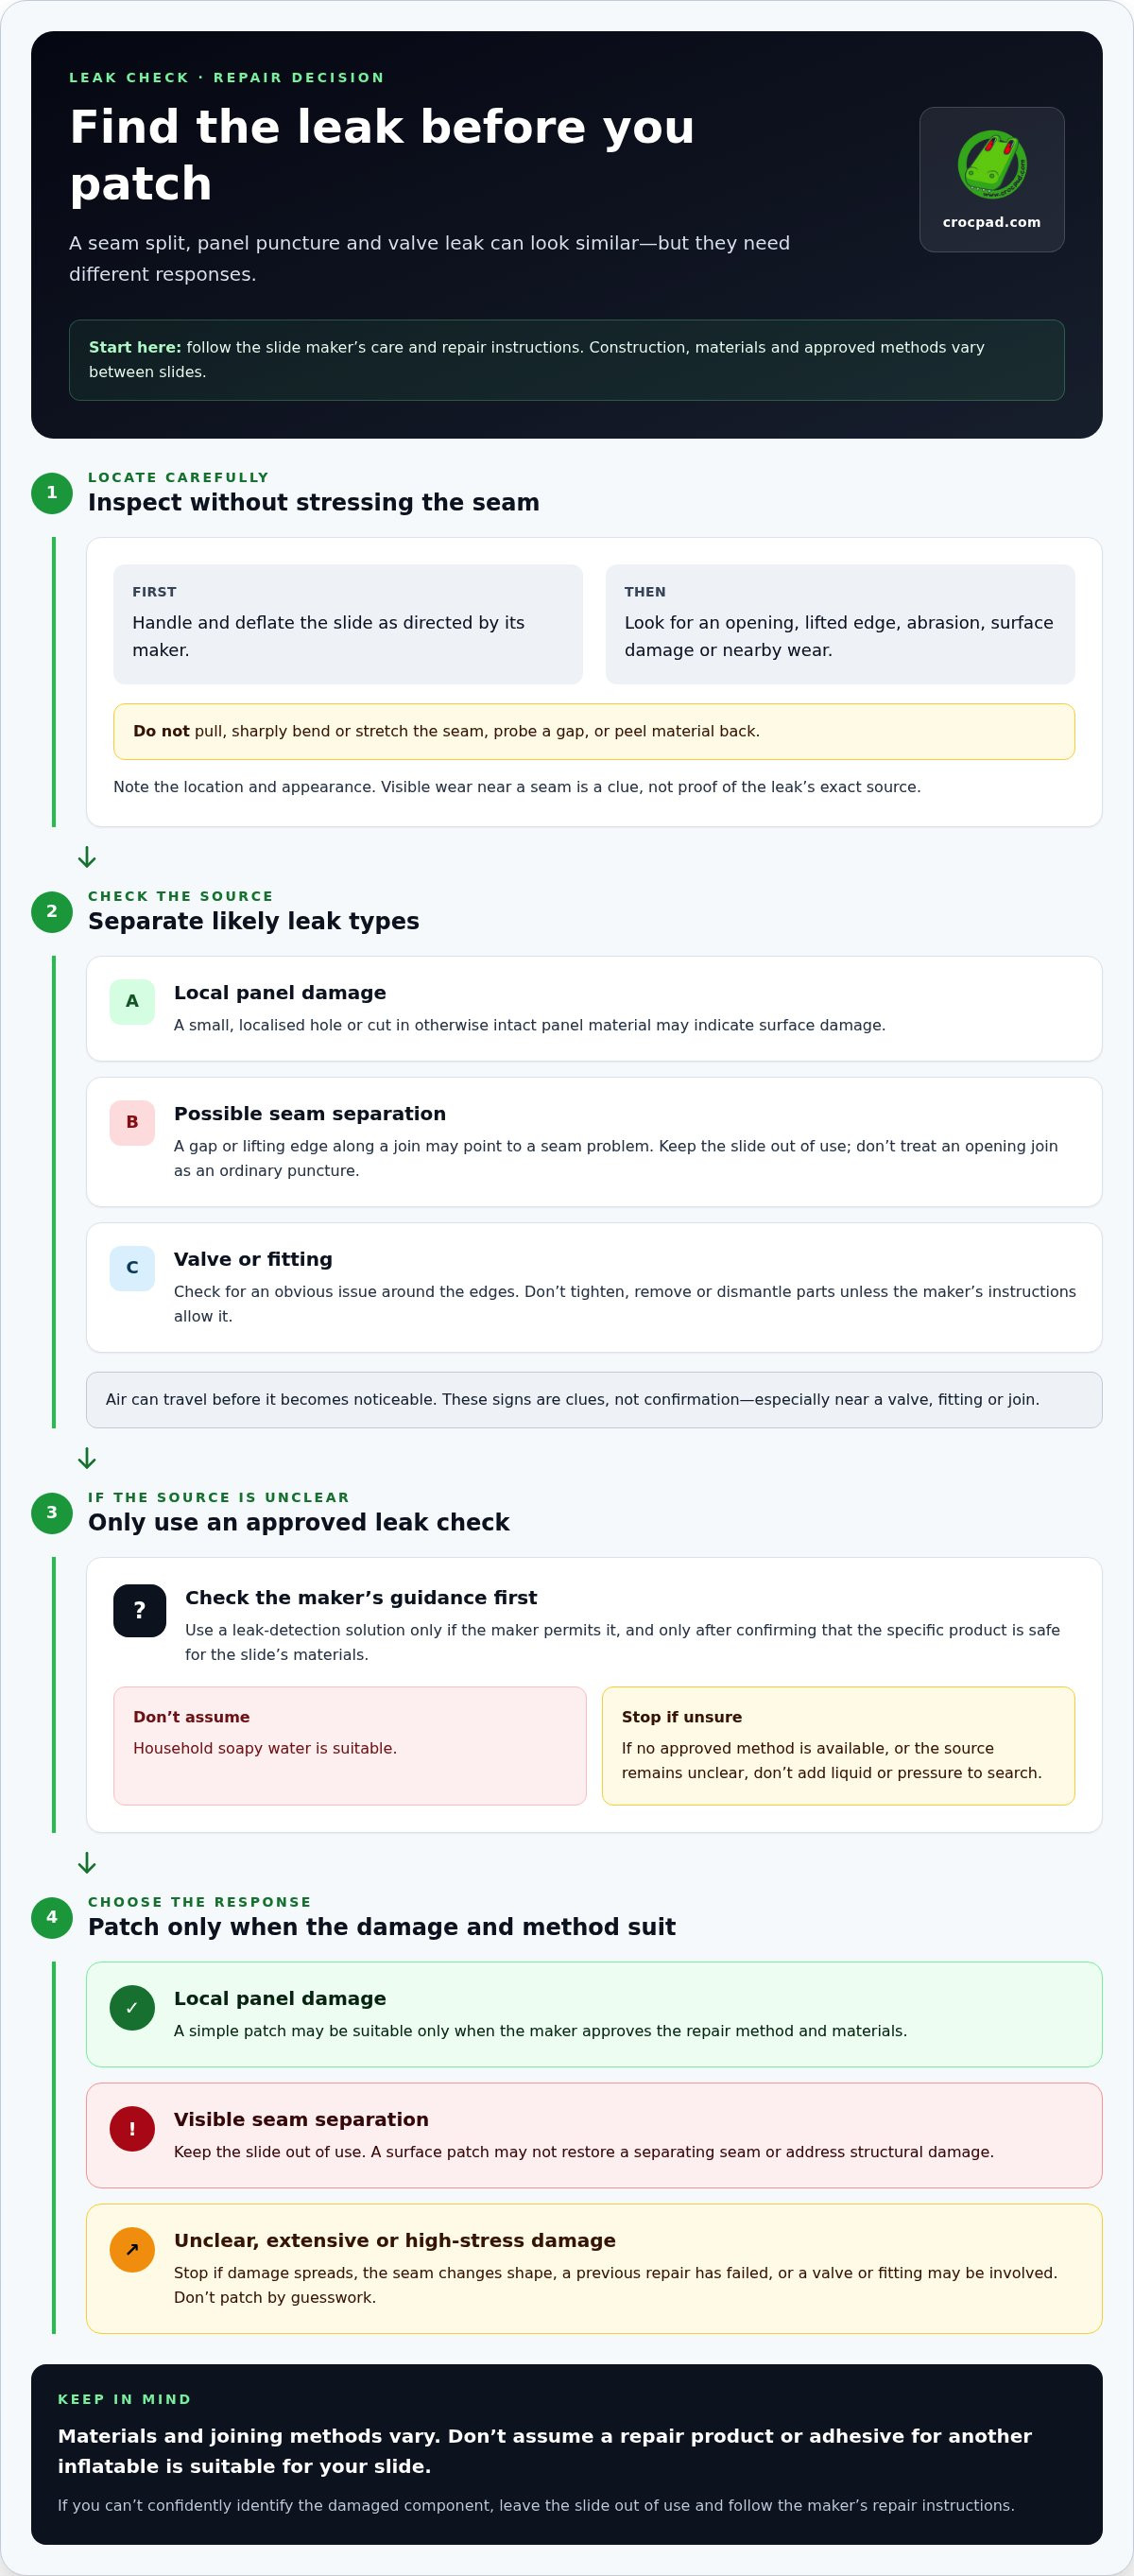
Start with the maker’s handling instructions. Deflate the slide as directed, then inspect the suspected area without pulling, sharply bending or stretching the seam. Look for a visible opening, a lifted or separated edge, abrasion, surface damage or wear nearby. Note the location and appearance, but don’t probe the gap or peel the material back.
If the maker permits a leak-detection solution, confirm that the specific product is safe for the slide’s materials and use it only as instructed. Don’t assume household soapy water is suitable. If there’s no approved way to locate the leak, or you can’t clearly see its source, stop rather than adding liquid or pressure to search for it.
Seam split, surface puncture or another leak?
A localised hole or cut in an otherwise intact panel may indicate surface damage. A seam problem may appear as a gap or a lifting edge along a join. These are clues, not proof: air can travel before it becomes noticeable, and visible wear near a seam doesn’t confirm the leak’s exact source.
Check valves and fittings as possible alternatives. Look for an obvious issue around their edges, but don’t tighten, remove or dismantle parts unless the maker’s instructions allow it. If the suspected leak is close to a valve, fitting or join, don’t apply a patch across the area until you know which component is affected.
Use this quick decision guide before researching how to patch a drop stitch water slide seam:
- Local panel damage: Note its location and appearance. A simple patch may be suitable only if the maker approves the method and materials.
- Visible seam separation: Keep the slide out of use. Don’t treat a lifting or opening join as an ordinary puncture.
- Unclear, extensive or high-stress damage: Stop. The same applies if the seam changes shape, damage spreads, or a valve or fitting may be involved.
Accurate diagnosis sets a safer limit on DIY work. If you can’t confidently identify the damaged component, don’t patch by guesswork.
Why drop-stitch construction changes the water slide seam repair
Drop-stitch construction connects two fabric layers with many internal threads. When inflated, those threads help hold the layers apart and maintain the structure’s shape. That general description doesn’t confirm how a particular slide is made. Materials, joining methods and repair instructions vary, so use the maker’s information for your slide.
A seam in or beside a pressurised structure may have a different role from an area of surface material. If a join separates, the damage may affect how the structure holds its shape under inflation and use. A small hole in an otherwise intact panel may be more localised, but appearance alone can’t establish that it’s safe to patch. Don’t assume the slide uses PVC, TPU, heat-welded joins or a particular adhesive unless its maker says so.
A patch that suits one inflatable material or construction may be unsuitable for another. Advice and repair products intended for a different inflatable aren’t automatically suitable for your slide.
What a patch can and cannot address
A surface patch may suit some isolated damage when the slide maker approves the method and materials. Don’t assume it will restore a separating seam or address damage affecting the structure. Scratches or scuffs can be cosmetic, while an opening join, distortion or damage that changes the panel’s shape may signal a more serious concern. If you can’t tell which you’re seeing, don’t use a patch as a test.
Suitability depends on the material, damage location and maker-approved repair method. A repair intended for a flat, unstressed area may not suit a join that flexes or carries load. When deciding how to patch a drop stitch water slide seam, start with the slide’s repair guidance, not a general recommendation for adhesive.
When not to attempt a DIY seam patch
Stop if the separation is extensive, has returned after an earlier repair, or is near an area that changes shape or appears highly stressed. Uncertain construction is also a reason not to improvise. Keep the slide deflated and out of use while structural damage remains unresolved. Follow the maker’s repair instructions; if they don’t describe a suitable DIY method, don’t substitute one intended for a different inflatable.
This cautious approach helps prevent a cosmetic fix from being mistaken for a sound repair. If you’re considering another option for outdoor play, explore Crocpad’s inflatable water slides.
Patch or another repair? Choose the right response to seam damage
Choose a repair route based on the damage’s location and extent, the surrounding material’s condition and the slide maker’s instructions. A neat-looking defect isn’t automatically suitable for a DIY patch. Use this comparison to decide what to inspect next, not as a substitute for product-specific repair guidance.
| Damage pattern | What to inspect | Is a simple patch appropriate? |
|---|---|---|
| Isolated surface damage | Check whether the damage is localised and the surrounding material appears sound, with no nearby separation or distortion. | Only if the maker approves a patch and specifies compatible materials and a method. |
| Seam separation | Look at the length and direction of the separation, nearby wear and whether the opening returns or spreads. | Don’t assume so. A patch is an option only if the maker’s instructions explicitly support it for that damage. |
| Widespread deterioration | Check for weakened material, multiple damaged areas or repeated failures, especially around a stressed area. | A simple patch may not address the underlying condition. Pause and follow the maker’s repair guidance. |
When a manufacturer-approved patch may be suitable
The clearest candidate is isolated damage with sound material around it and no sign that a join or the structure is affected. Even then, proceed only if the slide maker’s repair instructions approve the method. Match the patch and adhesive to the guidance for that slide. A product marketed for inflatables isn’t automatically compatible with yours. This narrow case doesn’t mean every separated seam can be patched.
Before deciding how to patch a drop stitch water slide seam, check the instructions for limits on damage location, preparation or repair products. If the guidance doesn’t cover your specific damage, don’t fill the gap with a generic method. A patch that adheres well to a surface may still be unsuitable for a seam or an area that flexes during use.
When to stop patching and choose a different repair
Pause DIY work if a seam split is long, spreading or recurring, or if the surrounding material looks weakened. Repeated failure matters: adding another patch over a returning separation may hide the symptom without resolving the cause. Damage across a stressed area also changes the decision, because the repair must account for more than the visible mark.
Keep the slide out of use while structural damage remains unresolved. The next step, whether a different repair or replacement, depends on the maker’s instructions and an assessment of the damage. Don’t set your own size limit or assume a patch will last. For another option for outdoor fun, explore Crocpad’s inflatable water slides.
How to prepare and patch a drop-stitch water slide seam
Start only when the slide maker’s instructions approve a repair for this damage and specify compatible materials. A generic inflatable repair kit isn’t automatically suitable. If you can’t verify the method, pause and keep the slide out of use rather than experimenting with adhesive or patch shapes.
Keep the slide out of use until the repair has completed the maker’s checks and is cleared for use. The steps below are a framework, not a substitute for the instructions supplied with your slide and repair product.
Prepare the slide and repair area
- Confirm the repair method and materials. Compare the slide maker’s guidance with the repair product’s instructions. Check that the patch, adhesive and any cleaning product are approved for the slide’s material and type of damage.
- Deflate and position the slide as directed. Follow the maker’s handling instructions. Position the damaged area so you can reach it without pulling the seam taut or putting extra strain on it.
- Clean only as approved. Remove dirt or residue with a cleaner the maker permits for the slide material. Don’t substitute household cleaners, unverified solvents or abrasive tools.
- Let the area dry fully. Keep the slide and repair surface dry before applying anything. Moisture or leftover cleaner may conflict with the repair product’s instructions, so don’t rush this step.
Apply the approved repair and check it carefully
- Prepare the patch as instructed. Use only the approved patch and adhesive. Follow directions for positioning, coverage, application amount or pressure. Don’t stretch the seam to make the patch fit.
- Allow the stated cure period. Follow the repair product’s instructions for curing conditions and timing. There’s no universal waiting period for every material or adhesive, so don’t guess or rely on another kit’s directions.
- Inspect and test only as directed. Once the stated cure period has passed, follow the maker’s instructions for checking the repair and reinflating the slide. Don’t invent a test pressure or return the slide to use just because the patch looks secure.
Household glue, unverified solvents, heat and improvised stitching introduce methods or materials the slide maker may not approve. If the repair product and slide instructions conflict, stop rather than choosing between them. If a check reveals renewed leakage, separation or a change in seam shape, deflate the slide and leave it out of use.
For another option for outdoor play, explore Crocpad’s inflatable water slides.
After a water slide seam repair: check the result and prevent repeat damage
A repair isn’t cleared just because the patch looks neat. Follow the repair product’s inspection and reinflation instructions, along with the slide maker’s guidance, before deciding whether the slide is ready to use. Don’t set your own test pressure or use an unapproved leak-checking method. If the instructions don’t explain how to assess the repair, keep the slide out of use until you have suitable guidance.
Check the repair before using the slide
Carry out only the check described by the maker or repair product. Look for renewed leakage, visible separation or movement, but don’t stretch, press or flex the seam to test it unless the instructions say to. Stop if anything changes. A repair that appears intact during one check isn’t a reason to ignore later signs of failure.
Keep the slide deflated and out of use if air loss returns, the seam starts to separate or its shape changes. Don’t add another layer of patch as a quick fix. A repeat failure needs a fresh assessment against the maker’s repair guidance.
Keep a simple maintenance record. Note the repair date, the damage location, the patch and adhesive used, and the repair product’s instructions. Store relevant packaging or written guidance with the record. This makes it easier to follow product-specific directions later and recognise a recurring problem without relying on memory.
Reduce avoidable wear after the repair
After water use, follow the slide maker’s directions for cleaning, drying and storage. Don’t pack the slide away wet if the instructions require it to be dry first. Use only approved cleaning products, and avoid pulling or dragging the repaired area during handling. These are general care principles, not a replacement for the instructions for your specific slide.
Build a quick visual check into setup and pack-down. Look over the repaired seam and nearby high-friction areas for fresh abrasion, lifting edges, distortion or other changes. Inspect without tugging at the repair. If you notice a new concern, pause and follow the maker’s advice before inflating or using the slide.
Keep the repair record with your slide-care information. If the product’s instructions change or you use a different repair product later, don’t assume the old method still applies. Material compatibility and inspection steps depend on the product and repair method, so follow the instructions that match the repair in front of you.
Careful checks help you decide whether the slide is ready for fun or needs to remain out of use. If you’re considering another option for outdoor play, explore Crocpad’s inflatable water slides.
Make your next move with confidence
A repair decision can shape more than the next afternoon of fun. It can help you avoid spending time and materials on a fix that isn’t right for the slide. If you’re still weighing how to patch a drop stitch water slide seam, let the product-specific guidance and the condition of the damage set the pace. There’s no need to rush a return to the water.
If the slide isn’t a safe option for now, a different setup can keep outdoor plans moving. Crocpad offers the Minima Pool Slide, Mikros Pool Slide and Megalo 3M Inflatable Water Pool Slide. Explore Crocpad’s inflatable water slides for another option for your next splash-filled day.
Choose a slide that suits your outdoor plans: explore Crocpad’s inflatable water slides.
Frequently Asked Questions
Can I use a standard inflatable repair kit on a drop-stitch water slide seam?
Not automatically. A kit may be designed for a particular material or type of damage, so its general “inflatable repair” label doesn’t prove it suits your slide’s seam. If you’re deciding how to patch a drop stitch water slide seam, compare the slide maker’s repair guidance with the kit’s material and use instructions. If compatibility or use on a seam isn’t clear, don’t apply it by guesswork.
Can I patch a drop-stitch seam while the water slide is inflated?
Don’t patch it while inflated unless the slide maker’s instructions specifically direct you to do so. Follow the prescribed deflation process before preparing the repair area. An inflated slide is under pressure, and you can’t assume its surface is in the right state for the approved repair method. If the instructions don’t explain how to position or handle the slide, pause rather than improvising.
How long should I wait before reinflating a patched water slide seam?
There’s no single waiting time for every repair. Follow the adhesive or repair product’s stated curing period and conditions, then follow the slide maker’s directions for reinflation and inspection. Don’t rely on a different product’s label or reinflate just because the patch feels dry to the touch. If the instructions are missing or unclear, keep the slide deflated until you have reliable product-specific guidance.
Is it safe to use a water slide if a small seam leak remains?
No. Don’t use the slide while it’s losing air, even if the leak seems minor or the slide still holds its shape. Ongoing air loss means the repair hasn’t resolved the problem, and you can’t assume the slide will remain stable during use. Deflate it and keep it out of use until the leak is properly addressed and the required checks are complete.
Can hot or wet conditions affect a water slide seam repair?
Yes, conditions can matter because repair products may specify limits for application and curing. Check the product instructions for requirements such as a dry surface or suitable working conditions, and follow the slide maker’s handling guidance too. Don’t apply a repair to a wet area or expose it to water before the instructions allow. Don’t guess about environmental limits if they aren’t stated.
Could patching a water slide seam affect its warranty?
It could, depending on the warranty terms and the repair method. Before applying a patch, read the warranty and care instructions for any conditions about unauthorised repairs, adhesives or damage. Keep a record of the damage and repair materials, and retain the relevant instructions. Don’t assume a DIY repair preserves warranty coverage or automatically cancels it; the written terms determine what applies.


