Deflating and rolling high pressure drop stitch mat gear is easier when you take your time. Before opening a valve, check the product instructions and clear a space where you can lay the mat flat. Releasing air in a controlled way and rolling without force can help prevent avoidable strain during pack-down.
This guide covers a practical routine, from checking the mat’s construction to storing it after use. Follow the manual for your specific product, especially for valve operation, pump use and the recommended rolling method.
Construction matters. Crocpad’s inflatable water slides use drop-stitch construction, while Crocpad Floating Water Mats are made with marine-grade XPE foam. Foam mats don’t need to be deflated, so inflatable pack-down steps don’t apply to them.
Key Takeaways
- Before deflating and rolling high pressure drop stitch mat gear, clear the mat and read its product manual.
- Operate the valve as directed, allowing air to escape in a controlled way rather than forcing the process.
- Once the mat has softened, align it and roll evenly from the recommended end without tight compression or sharp folds.
- Use a pump to release air only if the manual permits it and explains how.
- Check the valve and accessories before storage, and keep the roll away from direct sunlight. Never tow a Crocpad Floating Water Mat behind a boat or other watercraft. Towing may cause injury and voids the warranty.
Before deflating a high-pressure drop-stitch mat, identify its construction
First, check what the mat is made for. A high-pressure drop-stitch mat is an inflatable structure with internal threads connecting its outer layers. Air pressure firms the structure, while the threads help it hold a relatively flat shape. This construction is used in some recreational inflatables, but it doesn’t describe every mat used on the water.
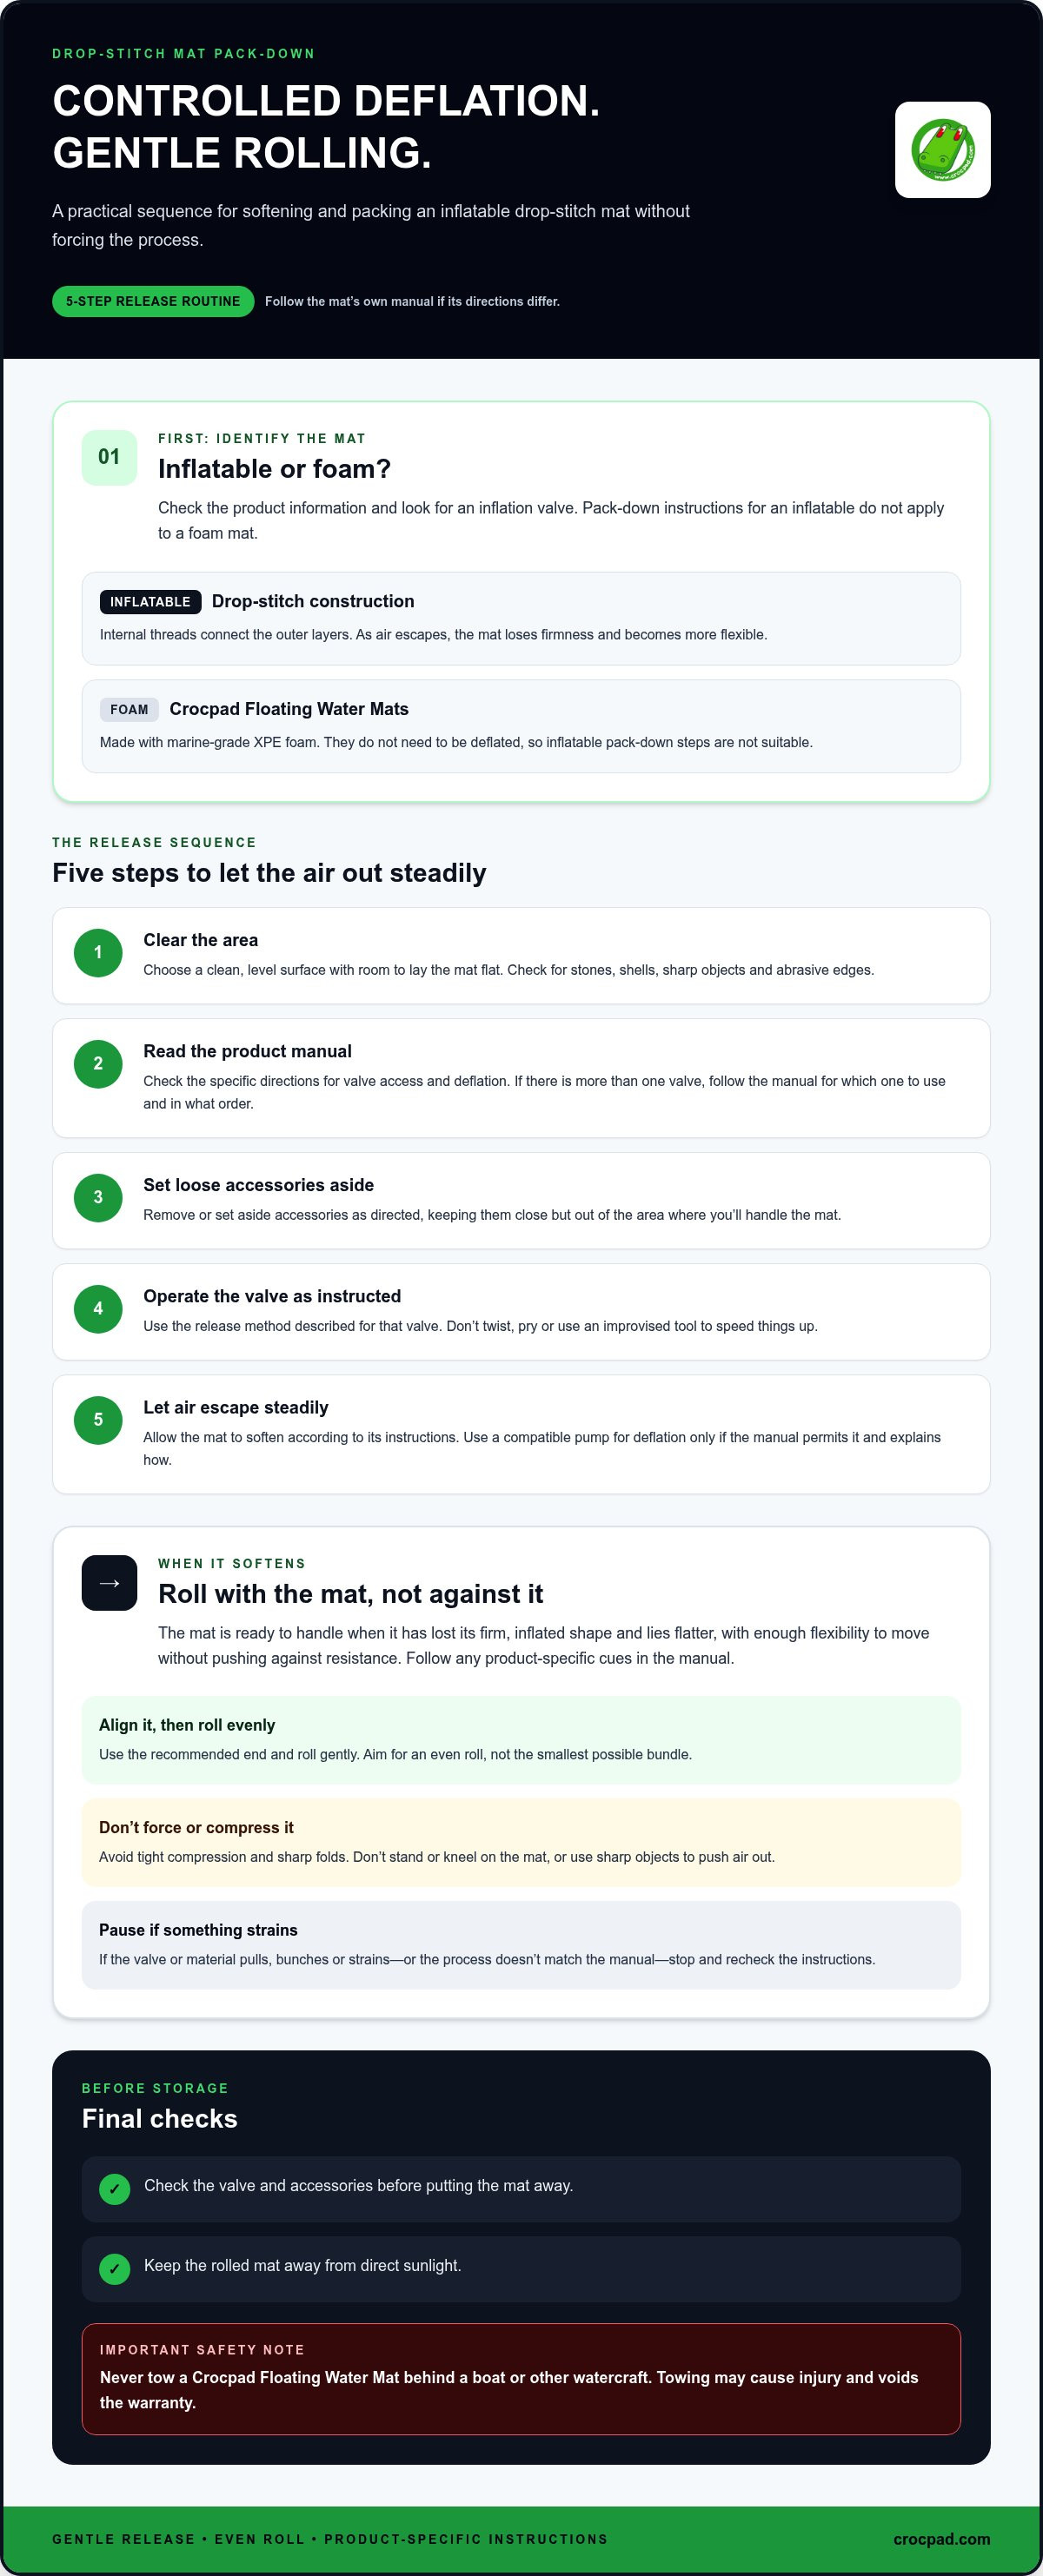
That distinction matters before you open a valve. Crocpad Floating Water Mats are made with marine-grade XPE foam, not high-pressure drop-stitch construction. They don’t need to be deflated, and inflatable pack-down instructions aren’t suitable for them. If you’re unsure what type of mat you have, check its product information and look for an inflation valve instead of relying on its shape or intended use.
The steps for deflating and rolling high pressure drop stitch mat products depend on the design. Valve mechanisms, accessories and recommended pack-down methods can differ. Use the mat’s own manual as your guide, rather than assuming instructions for another inflatable will apply.
How drop-stitch construction affects pack-down
Internal threads connect the mat’s outer surfaces and help keep them aligned as the inflatable becomes firm. For a general overview of how the material is made and achieves rigidity, see Dropstitch Inflatable Fabric. As air leaves the mat, it loses firmness and becomes more flexible, allowing it to lie flatter and be rolled according to its instructions. This change is expected. It isn’t a cue to press, fold or force the mat.
Think of pack-down in two stages: release air using the specified method, then prepare the softened material for rolling. How quickly the mat changes shape depends on its design and valve, so follow the manual rather than relying on a set time or generic method.
Check the mat and its instructions before starting
Find the manual before handling the valve. It should explain how to operate that valve and whether a pump or accessory can be used for deflation. Identify the valve and accessories, but don’t assume a pump is suitable just because it fits another inflatable.
Prepare a clear pack-down space. Stones, shells and rough edges can catch the material as you move it. Choose a clean, unobstructed surface and check it before laying out the mat.
- Confirm construction: Check the product information and look for an inflation valve. Don’t treat a foam mat as inflatable.
- Read first: Follow the mat’s own valve and deflation directions.
- Prepare the area: Clear sharp objects and leave enough room to lay the mat flat.
Once you’ve confirmed the mat is inflatable and prepared the space, follow its specific release instructions. Keep the manual close, particularly if the valve or supplied accessories are unfamiliar.
How to deflate a high-pressure drop-stitch mat in a controlled way
A steady release is easier to manage than trying to flatten the mat by force. Valve designs differ, so use the product manual throughout. The steps below give you a careful order of operations, but follow the manual wherever its directions differ.
Prepare the mat and release air
Set up before operating the valve. This keeps the mat clear of hazards and helps you avoid rushing while it is still firm. Follow this sequence:
- Clear the area. Move the mat onto a clean, level surface with enough room to lay it flat. Check for sharp objects and abrasive edges that could catch the material.
- Read the manual. Find the product-specific directions for deflation and valve access. If the mat has more than one valve, follow the manual to identify which one to use and in what order.
- Remove loose accessories. Take off or set aside accessories as directed. Keep them close, but out of the area where you’ll handle the mat.
- Operate the valve as instructed. Use the opening or release method described for that valve. Don’t twist, pry or use an improvised tool to speed things up.
- Allow air to escape steadily. Let the mat soften according to its instructions. If the manual permits pump-assisted deflation, use a compatible pump only as directed.
Let the mat flatten without stressing it
As air escapes, the mat should become less firm and easier to lay flat. Keep your body weight off it. Don’t stand or kneel on it, or place sharp objects on the surface to push air out. Pressing down may seem quicker, but it can put unnecessary strain on the fabric, valve area or seams.
Pause if the valve or material appears to pull, bunch or strain, or if the process doesn’t match the manual’s directions. Don’t force the valve or press harder. Recheck the instructions before continuing.
There’s no universal pressure reading that means a mat is ready to roll. Look for a practical change: it has lost its firm, inflated shape and lies flatter, with enough flexibility to handle without pushing or bending it against resistance. Follow any product-specific cues in the manual. Once the mat has softened, roll it gently rather than trying to compress it further.
For other water-day options, explore Crocpad recreational water gear, including inflatable slides made with drop-stitch construction.
How to roll a deflated drop-stitch mat without forcing it
Once the inflatable has softened, aim for a neat, even roll, not the smallest possible bundle. Work with the mat’s natural flexibility. If it won’t move easily, stop and check what’s holding it back instead of adding pressure. These steps apply to inflatable drop-stitch mats, not Crocpad Floating Water Mats, which are made from XPE foam and aren’t deflated for storage.
Align the mat before making the first fold
Lay the deflated mat flat on a clean surface. Smooth loose sections with your hands and line up the edges so the material isn’t skewed or bunched. Don’t drag it across rough ground to reposition it. Lift and adjust it carefully instead. Check the manual for the recommended rolling end and any specified sequence, and follow those directions over a general method.
- Flatten the mat. Let it rest in its deflated shape, then smooth the surface without leaning or pressing hard on it.
- Align the edges. Bring the sides into line and remove twists or uneven overlaps before starting.
- Choose the instructed end. Begin rolling from the end recommended in the manual. Follow any specified sequence rather than guessing.
- Roll evenly. Move at a comfortable pace, keeping the roll aligned from side to side. Avoid sharp creases, tight compression and sudden tugs.
Check the mat as you go. If one side starts to bunch, pause and straighten the material before continuing. A slightly wider, looser roll is better than forcing the mat into a narrow shape that resists its natural movement.
Roll steadily and secure it for storage
Resistance is a cue to stop, not push harder. The mat may still hold air, or its edges may have shifted out of alignment. Unroll enough to check, then follow the manual’s deflation directions if air seems trapped. Smooth and realign the material before trying again. If it still resists, don’t force the roll or use your body weight to compress it.
Once rolled, secure the mat only with supplied or manual-recommended straps. Use a storage bag only if the mat fits without pressure. Don’t cram it in or pull hard on the opening. If the roll won’t fit comfortably, check the product’s packing directions instead of making it tighter.
Before storing, make sure the roll is secure without being squeezed. Keep it away from direct sunlight, in line with Crocpad’s stated storage guidance. A careful pack-down makes the inflatable easier to handle next time. The right approach to deflating and rolling high pressure drop stitch mat gear follows its manual and lets the material move without strain.
Choose the right pack-down method for your mat and conditions
Choose a method that suits the mat’s valve and instructions, not simply the one that seems fastest. Manual air release is the baseline when you operate the valve as the manufacturer directs. Pump assistance is an option only if the manual explicitly permits it and explains how to use a compatible pump for deflation. If the instructions don’t support pump use, stick to the specified valve method.
Manual release or pump-assisted deflation?
Use this comparison to decide what to do next. It isn’t a substitute for the mat’s manual: valve designs and accessory compatibility are product-specific, so don’t infer them from appearance alone.
| Situation | What to do | Why it helps |
|---|---|---|
| Manual air release | Follow the mat’s valve instructions and let air escape as directed. | Keeps the method aligned with that valve’s design. |
| Pump-assisted deflation | Use a pump only if the manual explicitly permits it, and follow its directions for compatibility and operation. | A pump that works with another inflatable may not be suitable for this mat. |
| Mat resists rolling | Pause. Check for trapped air, a closed or stubborn valve, or edges that have shifted out of line. | Identifying the snag is safer than adding force. |
| Roll won’t fit its bag | Unroll and check alignment, then try again without tight compression. Don’t force the mat or accessories into an undersized bag. | A looser roll may be easier to manage than a strained, compact one. |
What to do when the mat will not roll neatly
Start with simple checks. If the mat still feels firm or springs back as you begin rolling, it may retain air. Reopen the valve only as the manual directs, then allow the mat to flatten further. Don’t use your body weight or an improvised tool to push air out, and don’t force a valve that won’t operate smoothly.
If the roll becomes lopsided, unroll it enough to smooth the surface and realign the edges before trying again. A slow, even roll may take up more space, but forcing a tighter roll can make the material bunch or fold sharply. Prioritise a comfortable, even roll over a smaller bundle that resists handling.
If it still doesn’t fit, check whether the manual specifies a folding sequence or storage method. Use only supplied or recommended straps and bags, and leave out accessories that make the bundle too tight. The right approach to deflating and rolling high pressure drop stitch mat gear is guided by the product instructions, not by how firmly you can compress it.
For another drop-stitch option for water-based fun, explore Crocpad inflatable water slides.
Finish safely, store the mat and find water gear that fits your plans
Before finishing pack-down, check the mat, its accessories and its storage spot. A tidy roll is only part of the job. Secure the valve as directed, and keep the gear away from sharp objects and direct sunlight. Follow the product manual and stated care guidance, particularly if they differ from a general routine.
A quick post-use and storage checklist
Use this final check for an inflatable drop-stitch mat, adapting each step to its manual. Valves, accessories and storage methods can vary.
- Valve: Check that it’s closed or secured as the product manual instructs.
- Care: Wipe clean or hose down in line with the product’s care instructions.
- Accessories: Gather loose items and pack them as directed, without wedging them into a tight roll.
- Roll: Make sure it’s even and secured with supplied or recommended straps.
- Storage: Choose a spot away from direct sunlight, sharp objects and surfaces that could damage the gear.
Keep the storage area clear. A sharp tool or rough edge nearby can damage a rolled mat when gear is moved or unpacked. Follow the product’s stated limits during use as well as storage, and don’t treat a general pack-down guide as a substitute for its manual.
Keep water-mat safety instructions specific
Product type matters. Crocpad Floating Water Mats are made with marine-grade XPE foam, while Crocpad inflatable slides use drop-stitch construction. Foam mats aren’t high-pressure drop-stitch inflatables, so don’t apply valve or deflation steps to them. Use the care instructions for the specific product you own.
Never tow a Crocpad Floating Water Mat behind a boat or any other watercraft. Towing may cause injury and voids the warranty. Don’t jump onto floating mats, and don’t use them on rough surfaces without a protective mat. Keep sharp objects clear, and follow the product’s safety guidance and stated limits rather than assuming instructions for another type of water gear apply.
A careful routine for deflating and rolling high pressure drop stitch mat gear ends with product-specific checks, not extra force or guesswork. Store your gear thoughtfully and bring the same care to your next day on the water. If you’re planning your setup, explore Crocpad’s recreational water gear, including foam Floating Water Mats and inflatable slides, and choose products with their different constructions in mind.
Make your next pack-down part of the plan
Make pack-down the final step of your water-day routine, not a race to get everything into storage. Give yourself room to work, keep the product instructions handy and pause if anything feels forced. That simple habit makes deflating and rolling high pressure drop stitch mat gear easier to handle with care, even when you’re ready to head home.
As you plan your next outing, consider the setup that suits the day and the people joining you. Crocpad’s range includes inflatable slides made with drop-stitch construction and Floating Water Mats made with XPE foam. Choose gear with its specific design and guidance in mind.
Explore Crocpad’s recreational water gear and find options for your next day by the water. Follow each product’s guidance and enjoy getting back out there.
Frequently Asked Questions
How do you deflate a high-pressure drop-stitch mat?
Follow the valve procedure in the mat’s own manual and let air escape using that method. When deflating and rolling high pressure drop stitch mat gear, avoid rushing or pressing on the mat to flatten it. Remove attachments that could snag as you handle it, and keep the area clear. If the valve won’t operate as described, stop and check the instructions rather than forcing it.
Can you use a pump to deflate a drop-stitch mat?
Only if that specific mat’s manual explicitly permits pump-assisted deflation. A pump’s ability to inflate a product doesn’t automatically mean it can safely draw air out, and a fitting connection alone doesn’t establish compatibility. Check the instructions for the permitted setup and operating method. If they don’t describe pump deflation, use the specified valve procedure instead. Don’t experiment with another pump setting.
Which direction should you roll a drop-stitch mat?
Use the end and sequence stated in the mat’s manual, as designs and valve positions vary. If the instructions don’t specify a direction, lay the mat flat, line up its sides and make a relaxed, even roll without sharp creases. Check its shape as you go. If an edge bunches, pause and realign it rather than rolling over a twist. Don’t assume every mat should be rolled from the valve end.
Why is my drop-stitch mat difficult to roll after deflating?
Check for remaining air, shifted edges or a section folded underneath. Unroll enough to inspect the mat, then use the valve only as its manual directs. If it still resists, or you notice the valve area, fabric or seams pulling, stop and consult the instructions. Don’t use your body weight to force the roll into shape.
How should you store a drop-stitch mat after rolling it?
Store the rolled mat out of direct sunlight. Use its supplied storage bag only if the roll fits without force. Keep the mat separate from sharp tools and rough equipment, and avoid placing heavy items on top of it. Follow the product’s cleaning instructions before storage, and check its manual for any additional directions.
Can you tow a floating water mat behind a boat?
No. Never tow a Crocpad Floating Water Mat behind a boat or any other watercraft. Towing may cause injury and voids the warranty. Use the mat only as directed in its product guidance. Crocpad’s safety instructions also say not to jump onto floating mats, to keep them away from sharp objects and to use a protective mat on rough surfaces.