

Picture this: you're finally horizontal on your floating mat, the Aussie sun is shining, and the kids are playing happily, but then you realise you're ten metres further from the boat than you were two minutes ago. It's a common frustration for every boatie and beachgoer across our glorious waterways, but learning how to anchor a floating mat correctly is the difference between a relaxing afternoon and a stressful rescue mission. You shouldn't have to worry about heavy, rusted anchors or the fear of tearing your foam at the tether point every time the tide turns.
At Crocpad, we agree that your time on the water should be about recovery and joy, not wrestling with confusing knots or chasing a drifting island. This Crocpad guide promises to help you master the art of securing your floating water mat using a dynamic bungee system designed for rugged Australian conditions. We will preview the best gear for wind and currents, explain why reinforced nylon mesh is a game-changer for structural integrity, and show you how to transform your mat into the ultimate safe social hub for your next adventure on the water.
Key Takeaways
- Learn why a weighted system combined with a bungee tether is essential for keeping kids and pets safe from drifting.
- Discover how to anchor a floating mat using the right gear, including why elasticity is the secret to preventing foam tears in choppy water.
- Understand why the internal structure, such as Crocpad’s dual nylon mesh layers, is more important than colour when choosing a mat that handles tension.
- Master the pro setup sequence, from letting your mat relax on the water to securing it to reinforced marine-grade grommets.
- Get expert tips on post-trip care and salt water rinsing to ensure your gear survives the harsh Aussie sun for years.
Why Proper Anchoring is Critical for Your Floating Water Mat
Anchoring isn't just about dropping a heavy object into the water; it's a strategic combination of a weighted system and a dynamic bungee tether designed to keep your island exactly where you want it. When you understand the principles of anchoring, you can ensure your Floating Water Mat remains a stable oasis rather than a drifting hazard. Learning how to anchor a floating mat correctly keeps the focus on rejuvenation and fun rather than constant repositioning.
To better understand this concept, watch this helpful video showing a perfectly secured setup:
Safety is the primary driver for a solid anchoring setup. A sudden gust of wind can quickly push a mat away from your boat or the shore, which is a nightmare scenario if children or pets are on board. Beyond safety, a secure anchor protects your investment. Without a tether, your mat can easily end up shredded against sharp rocks or tangled in mangroves, leading to permanent damage. A 'set and forget' system also ensures your mat stays at the centre of the social action, keeping the party close to the boat's ladder or your beach camp.
Wind and Current: The Hidden Forces at Play
Australian estuaries and coastal waters are notoriously unpredictable. Even a light sea breeze can turn a 5.5m mat into a massive sail, creating enough force to pull a light anchor across the seabed. You also need to account for surface currents, which often move in a different direction to deep-water flow. This creates a 'tug-of-war' effect on your gear. If you use a rigid rope, the tension can tear through cheap foam mats. This is why we prioritise mats with dual layers of nylon mesh for superior pull-strength at the grommet.
Legal and Etiquette Considerations on Aussie Waterways
Being a responsible boatie means ensuring your gear doesn't become a hazard for others. Never anchor your mat in a way that blocks public boat ramps, narrow channels, or high-traffic jet ski zones. Riparian etiquette suggests that you should only moor your mat in areas where it won't interfere with navigation or the enjoyment of other beachgoers. Keeping your mat tightly secured ensures you're following local waterway guidelines while enjoying a premium day on the water.
The Essential Anchoring Kit: What You Need Before Heading Out
You wouldn't head out into the swell without the right safety gear, and your floating oasis deserves the same respect. A premium setup requires more than a spare bit of nylon rope from the garage. To truly master how to anchor a floating mat, you need a kit that balances weight, elasticity, and visibility. Using the wrong components doesn't just risk a runaway mat; it can cause structural failure at the tether point before your afternoon has even peaked.
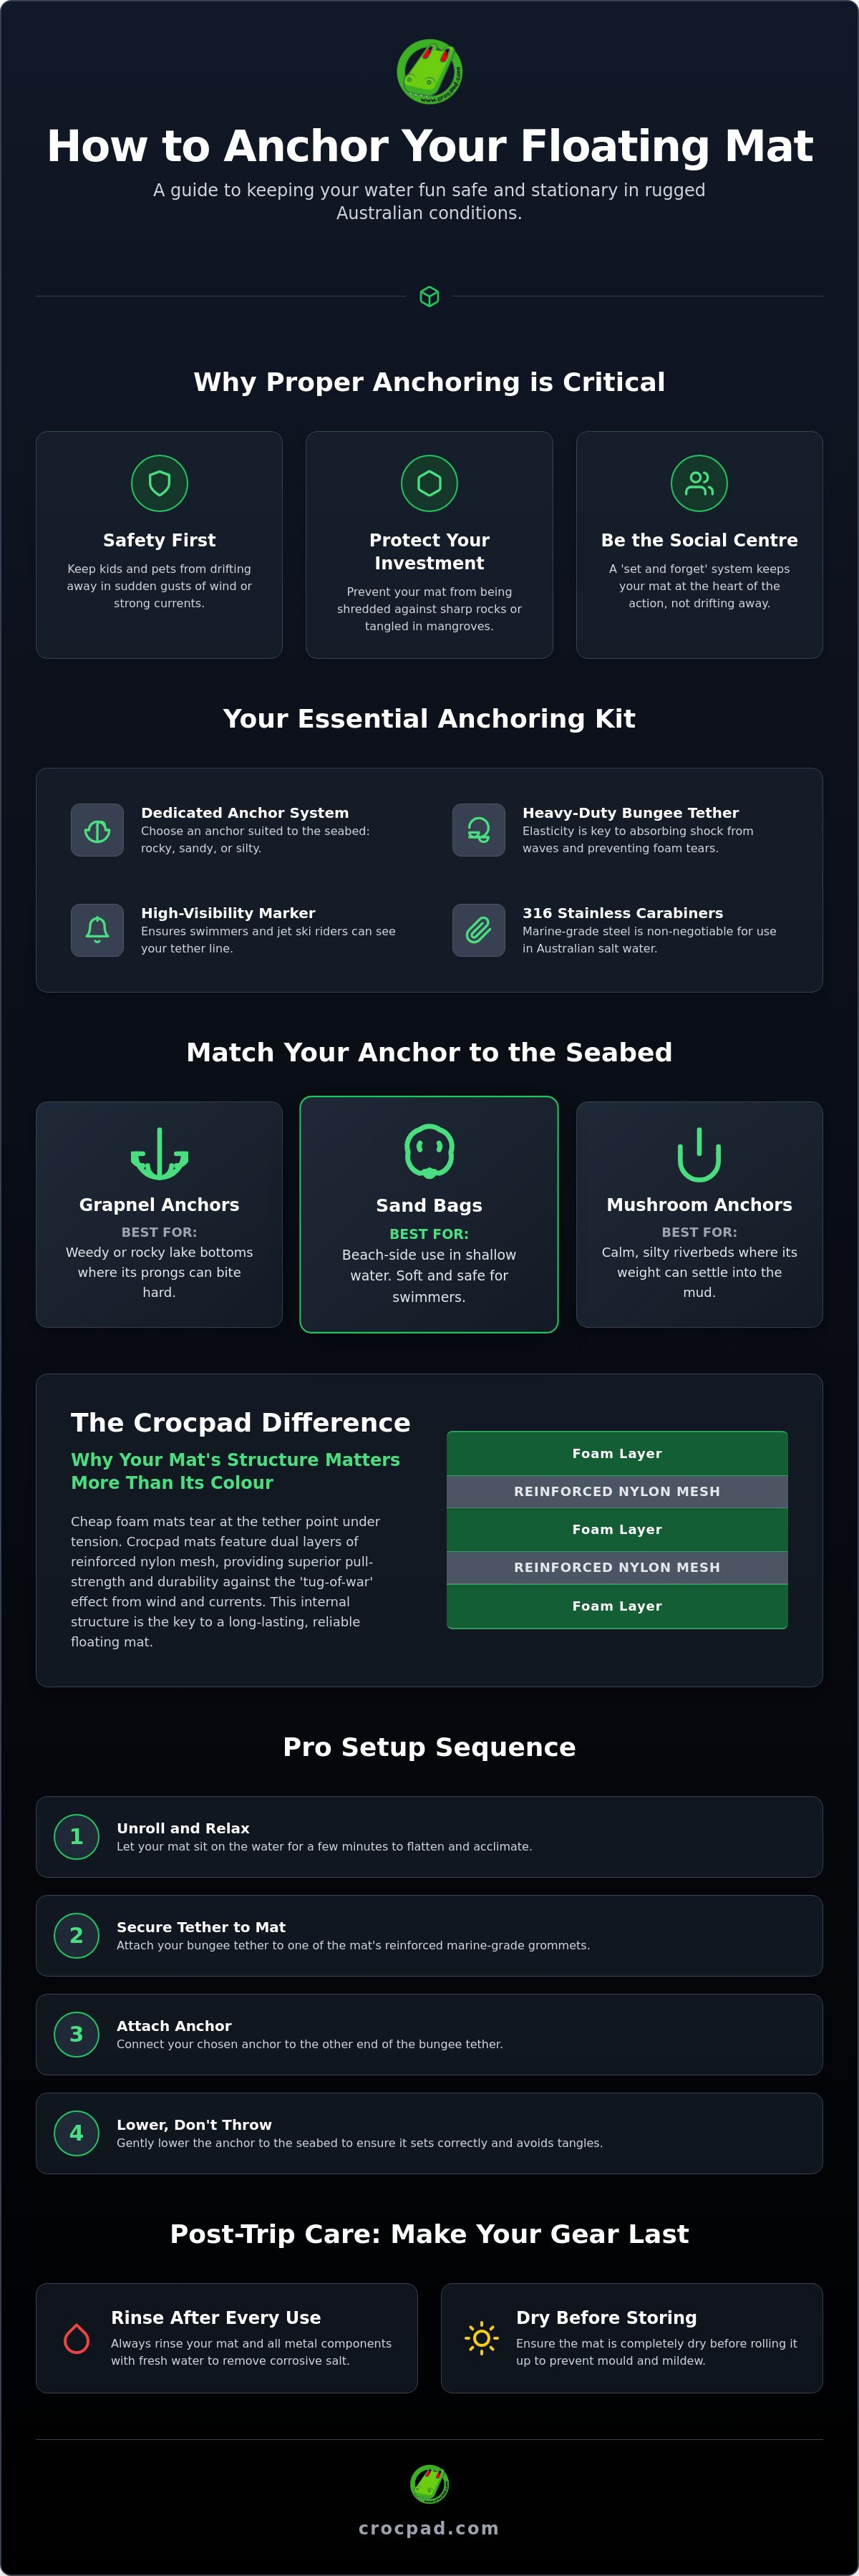
Your kit should start with a dedicated anchor system, a heavy-duty bungee tether, and 316 stainless steel carabiners. These marine-grade materials are non-negotiable for anyone playing in Aussie salt water, as standard steel will rust and seize within weeks. Finally, adding a high-visibility floating marker to your line ensures that other swimmers and jet ski riders can see your tether, preventing accidental entanglements in busy waterways.
Choosing the Right Anchor for the Bottom
Matching your anchor to the seabed is the first rule of a "set and forget" system. To anchor safely in NSW and across Australia, consider these three options:
- Grapnel Anchors: These four-pronged folding anchors are the gold standard for weedy or rocky lake bottoms. They bite hard into the structure to keep even a 5.5m mat stationary.
- Sand Bags: These are brilliant for beach-side use. They provide enough weight to hold position in shallow water but are soft on the feet if a swimmer accidentally bumps into them.
- Mushroom Anchors: Best suited for calm, silty riverbeds where the weight can settle into the mud for a firm grip.
While a plastic bucket filled with concrete is a classic Aussie DIY fix, it's often too heavy to handle safely from a mat and lacks the refined "bite" of a dedicated marine anchor. If you are starting from scratch, checking out a complete Floating Water Mat kit is the smartest way to ensure all your components are marine-grade and ready for the salt.
The Role of the Bungee Cord
The bungee tether is the most critical part of your setup. Unlike a static rope, a bungee acts as a shock absorber during choppy weather or when the kids are jumping on and off. You should follow the 3:1 scope rule; this means having three metres of tether for every one metre of water depth. This angle allows the anchor to dig in properly while giving the bungee room to stretch. Shock load is the sudden, violent force exerted on a tether point when a mat reaches the end of a non-elastic rope during a swell or gust. This intense pressure is the primary cause of foam tears, making the elasticity of a bungee cord your mat's best insurance policy.
Buying Guide: Choosing a Mat That Won't Tear Under Tension
When you're researching how to anchor a floating mat, the most important factor isn't actually the weight of the anchor. It's the strength of the mat's tether point. Many boaties make the mistake of choosing a mat based on a vibrant colour or a low price, only to find the foam shreds the first time a jet ski creates a wake nearby. The secret to a long-lasting setup is the 'inner core' of the foam itself, which must be able to withstand the constant pull of the tide.
Crocpad provides a distinct advantage here. We offer the only mats on the Australian market featuring two layers of nylon mesh reinforcement. While users on community forums often complain about metal grommets pulling straight through standard foam, our dual-layer mesh provides the pull-strength needed to withstand significant tension. Whether you're securing a compact 2m mat or a 5.5m giant, this structural integrity is what prevents your investment from becoming a floating piece of litter.
Keep in mind that according to the official boating safety equipment checklist, most vessels are required to carry an anchor and line. It makes sense to apply that same safety-conscious mindset to your recreational gear. A larger mat acts like a giant sail; it requires a much more robust strategy for how to anchor a floating mat compared to a smaller version with less surface area for the wind to catch.
Top Picks from the Crocpad Collection
- Floating Water Mat 5.5m: The ultimate party island for large crews. It's built for those who want a stable, reliable platform for all-day socialising.
- Floating Water Mat 2m: Perfect for the back of the ute. This compact size is ideal for smaller pool setups or calm river days.
- Floating Water Mat and Waterproof Bag: The smart choice for easy transport. This bundle ensures your mat stays protected and easy to carry between the car and the water.
- Check out the full Crocpad Water Mat collection for the latest 2026 specs.
Buoyancy vs. Weight: Calculating Your Load
Stability comes down to the quality of the foam layers. We use three layers of marine-grade XPE foam to ensure maximum buoyancy and a firm walking surface. When you're deciding which size to buy, match the mat to your boat's storage capacity and roll diameter. A 5.5m mat offers incredible social space, but it's a heavier load to anchor in a current. Investing in high-performance materials now ensures you aren't stuck with a 'single-summer' toy that fails when the weather turns.
Step-by-Step: How to Anchor Your Mat Like a Pro
Mastering the setup of your island is just as important as the gear you choose. A sloppy anchoring job leads to a day spent adjusting ropes instead of relaxing. Follow these five professional steps to ensure your mat stays exactly where you parked it, regardless of the breeze or the tide. If you are still looking for the perfect platform, you can browse the full range of Floating Water Mats to find a model that suits your crew.
- Step 1: Let it relax. Unroll the mat and let it 'relax' on the water for 5 minutes. This allows the high-density XPE foam to flatten out after being coiled in storage, preventing the edges from curling while you work.
- Step 2: Secure the tether. Attach your bungee tether to the reinforced Crocpad grommet. Because our mats feature dual layers of nylon mesh, this point is built to handle the tension of a full day's use.
- Step 3: Position and drop. Drop the anchor upwind or up-current from your desired spot. This ensures the natural flow of the water pushes the mat away from the anchor, keeping the line taut and the mat stable.
- Step 4: Set the scope. Adjust the rope length to account for depth and tide. Remember the 3:1 ratio discussed earlier; you need enough length so the anchor can bite into the seabed at an angle.
- Step 5: The tug test. Perform a firm 'tug test' by pulling on the tether from the mat. If the anchor holds steady, you are ready for a day of rejuvenation.
Anchoring to a Boat vs. Anchoring to the Bottom
When you are boat-side, the 'stern tie' method is the safest way to keep the mat clear of the boat's propellers. For our 5.5m 'Giant' mats, we recommend a 'bridle' setup. This involves attaching the tether to two separate points on the mat to distribute the tension evenly across the foam. Never anchor a mat from a middle point in a strong current; this creates an unstable pivot that can cause the mat to flip or the grommet to experience unnecessary stress.
Adjusting for the Australian Tide
A 'short-tether' is a major hazard during a rising tide in Australian estuaries. If your rope is too short, a rising tide will eventually pull the mat underwater or drag the anchor out of position. To calculate scope for a 2-metre tidal variance, add the maximum expected tide height to your current depth and multiply the total by three. Using a small buoy system can also help keep your anchor line visible and prevent it from tangling around submerged logs or rocks as the water level changes. This proactive approach ensures your 'set and forget' system actually stays set all day long.
Maintenance and Safety: Making Your Gear Last for Years
Mastering how to anchor a floating mat is only half the battle; the real longevity of your island comes from how you treat your gear after the sun goes down. Australian salt water and relentless UV rays are the biggest threats to your recreational equipment. A simple post-trip routine ensures your mat remains a reliable social hub for years rather than a single-season purchase. Taking five minutes to care for your gear today saves you from replacing expensive hardware or dealing with degraded foam next summer.
- Rinse everything. Salt water is incredibly corrosive. Even marine-grade stainless steel carabiners and galvanised anchors will eventually show signs of wear if they aren't flushed with fresh water. Always rinse the bungee tether and the mat's grommets thoroughly.
- Inspect the tether point. While our dual-layer nylon mesh is designed for high pull-strength, you should regularly check for any signs of foam compression. If you've spent a day in high winds, ensure the grommet hasn't been pulled out of alignment.
- Roll, don't fold. Folding your mat creates stress lines that can lead to cracks. Roll your mat loosely to avoid setting a 'permanent curl'. It is best to let the mat cool slightly in the shade before rolling it; rolling hot foam can make it harder to flatten out during your next trip.
- Use professional protection. The Floating Water Mat and Waterproof Storage Bag bundle is the ultimate convenience choice. It shields your mat from dust, spiders, and accidental punctures while it's tucked away in the garage or on the boat.
Pet Safety and Access
Your four-legged mates shouldn't miss out on the action, but their claws can be tough on foam if they are constantly scrambling to get on board. While our marine-grade XPE is durable, it's best to train your dog to stay near the centre of the mat where it is most stable. For older dogs or those who struggle to climb up from deep water, using an Inflatable Dog Ramp provides a dedicated entry point. This protects the edges of your mat from scratching and ensures your anchored island remains a stress-free zone for the whole family.
Sun Protection and UV Care
The Aussie sun is famously harsh, but our mats are engineered to survive it. We use UV-stabilised, 3-layer XPE foam to prevent the material from becoming brittle or fading over time. Avoid using harsh chemical cleaners, degreasers, or bleach, as these can break down the foam's protective surface and reduce its lifespan. A simple wipe with fresh water and mild soap is all you need to keep it looking brand new. Now that you've mastered how to anchor a floating mat and maintain it for the long haul, it's time to get out there and enjoy the blue. Get your heavy-duty water mat today and own the water this summer.
Own the Water with Confidence and Stability
You've now mastered the technical side of securing your island. By choosing a mat with Australia's only 2-layer nylon mesh reinforcement, you've solved the common problem of tether-point tearing before you even hit the beach. You understand that the secret to how to anchor a floating mat lies in the combination of a dynamic bungee system and the correct scope for the tide. This knowledge transforms your mat from a drifting hazard into a safe, reliable social hub for the whole crew.
Our marine-grade XPE foam is engineered for maximum UV resistance; it ensures your investment survives the brutal Aussie sun season after season. With fast 48h shipping from our local Sydney, Brisbane, and Perth warehouses, you won't have to wait long to start your next adventure. It's time to stop worrying about the current and start enjoying the rejuvenation that only a day on the water can provide.
Shop the 2026 Floating Water Mat Collection and prepare for your most relaxing summer yet. We'll see you out there.
Frequently Asked Questions
What is the best type of anchor for a floating water mat?
Grapnel anchors are the gold standard for most Australian lake and river conditions because their folding prongs bite hard into weedy or rocky bottoms. If you are spending the day at the beach, a dedicated sand anchor or a weighted sandbag is a better choice to prevent drifting in the shore break. Always match your anchor weight to the size of your mat and the strength of the local current.
Can I anchor my mat in the ocean or only in lakes?
You can anchor in the ocean, but it requires much more heavy-duty gear and constant monitoring compared to a calm lake. Coastal swells and tidal surges can put immense pressure on your equipment, so always use a high-quality bungee tether to absorb the shock. For the best experience, stick to protected coves or estuaries where the water is flatter and the wind is less likely to catch the mat like a sail.
How do I prevent the tether point on my mat from tearing?
The only way to truly prevent tearing is to choose a mat with internal reinforcement, like the dual-layer nylon mesh found in Crocpad mats. This structural core provides the pull-strength needed to handle tension that would shred standard foam mats. Additionally, never use a rigid rope; a flexible bungee tether is essential for absorbing the energy of waves and keeping your tether point intact.
Is it safe to tether two floating mats together?
Yes, it is safe to tether two mats together as long as you use a flexible bungee connection rather than a rigid rope. Rigid lines cause the mats to jerk against each other, which can damage the foam or pull out grommets. Using a bungee allow the mats to move independently with the water's rhythm, creating a massive, stable social hub for your entire crew.
What length of bungee cord do I need for a 5-metre deep lake?
You need a tether at least 15 metres long to follow the 3:1 scope rule, which is the industry standard for how to anchor a floating mat effectively. This length ensures the line hits the bottom at an angle, allowing the anchor to dig in properly. If your tether is too short, the mat will pull vertically on the anchor, causing it to skip across the lake floor during a gust of wind.
Can I use a brick or a cinder block as a DIY anchor?
Avoid using bricks or cinder blocks because they lack the "bite" required to hold a large foam mat in place. These DIY weights often slide across the sand or mud, leaving your mat to drift away with the kids on board. They also have sharp, abrasive edges that can damage your boat's gelcoat or the mat's surface, making a dedicated marine anchor a much safer investment.
Do I need to anchor the mat if I am just using it in a pool?
You don't need a heavy marine anchor in a pool, but a light tether is helpful to keep the mat away from the filter box or steps. A simple nylon cord tied to a pool ladder or fence post works perfectly to keep your island in the sun. This prevents the mat from drifting into the "splash zone" or blocking the path of other swimmers while you relax.
How do I stop the mat from curling up while it's anchored?
Let the mat sit flat on the water for at least five minutes before you finish learning how to anchor a floating mat for the day. This allows the marine-grade XPE foam to "relax" and lose the memory of being rolled up in storage. If the edges are particularly stubborn, simply flip the mat over for a few minutes so the water's weight helps flatten the curl before you secure your tether.


